
I don’t think I have ever met someone who has been excited about processing 1099s at year-end. Whether gathering the data and filling out the forms or hunting down missing Tax-IDs, it all seems pretty overwhelming on top of an already demanding workload. However, it doesn’t have to be that way; with a bit of planning, you can take the pain out of processing 1099s with Microsoft Dynamics GP. Here’s 4 simple steps to help simplify the process.
STEP 1: VERIFY VENDOR SETUP IN DYNAMICS GP’S “VENDOR MAINTENANCE WINDOW”
The first step in processing 1099’s in Dynamics GP is to ensure your vendors are set up properly. Click the Options button from the “Vendor Maintenance Window”. The “Vendor Maintenance Options Window” allows you to enter the Tax ID and select the appropriate Tax Type and 1099 Box for each vendor.
The 1099 Box choices are based on the Tax Type selected. In our example, Box 1 (Rents) is selected.
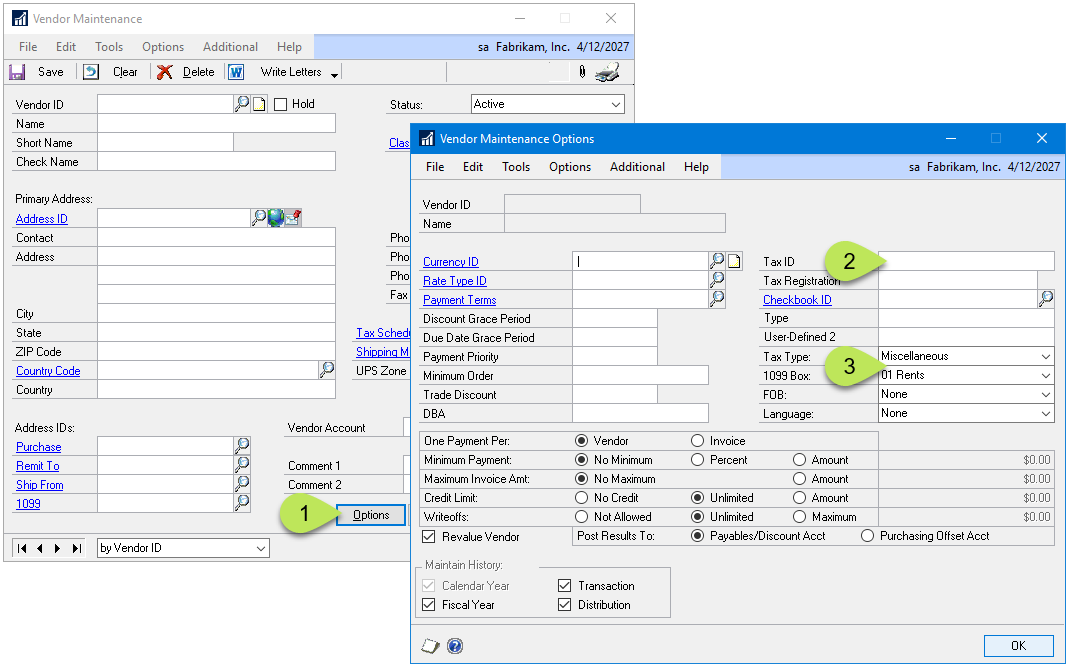
Editing the 1099 settings on the Dynamics GP “Vendor Maintenance Options Window”.
It’s also a good idea to confirm the 1099 address as it will print on the vendor’s 1099 form. Commonly, this is the same as the Remit To address, but Dynamics GP gives us the power to make it a different address.
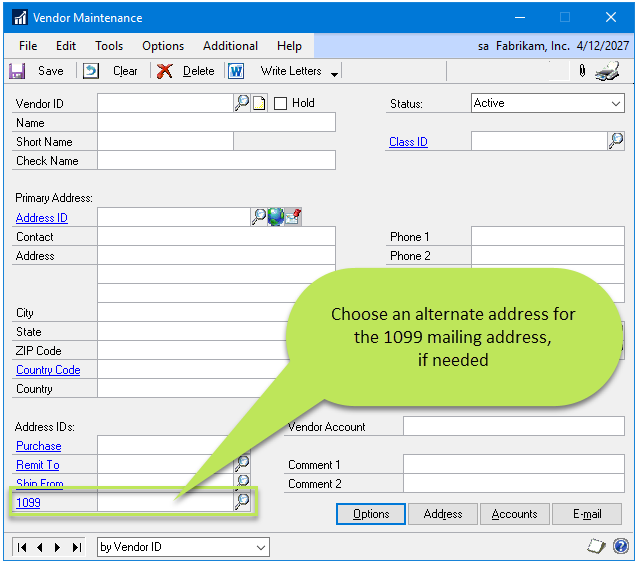
Dynamics GP gives you the power to choose an alternate 1099 address.
Making these selections before you begin processing transactions will ensure that Microsoft Dynamics GP will track your vendor’s purchases and place them in the correct 1099 bucket to report them at year-end.
STEP 2: Edit Vendors
OK, we all know this is not a perfect world, and not having all the information before we begin processing transactions is inevitable. But don’t worry; Microsoft Dynamics GP has you covered. They have a great article that goes over the ins and outs of updating a vendor and its transactions mid-year; it can be found here.
The article references the “Update 1099 Information Window” (Tools → Utilities → Purchasing → Update 1099 Information), which makes editing and updating vendors and transactions a breeze. This window updates a vendor’s Tax Type, Box Number, and 1099 amount fields. Note that this window will only allow you to update Vendors who already have a 1099 Type entered on their Vendor Card.
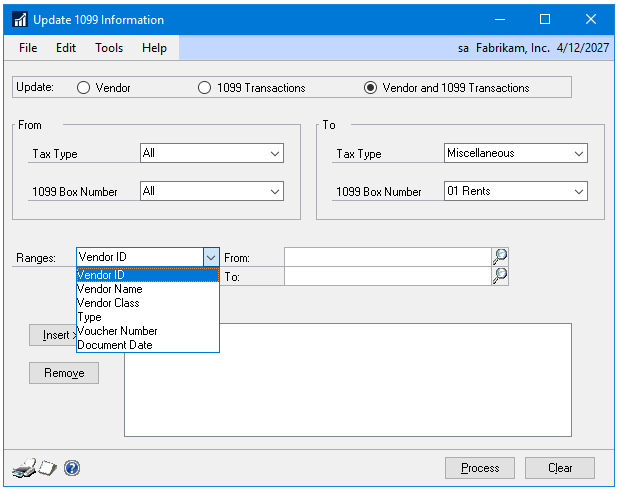
The “Update 1099 Information Window” can update 1099 settings on posted transactions.
STEP 3: Review Your Work
Now that you have all of your vendors updated and edits made, it’s time to review your work. You can either jump in and print your 1099s or use the “1099 Details Window”. I like the “1099 Details Window” as it gives you a better picture of the transactions one vendor at a time. You can find this window by navigating to Cards → Purchasing → 1099 Details. It will allow you to view totals by Month or Year for your selected Tax Type. Additionally, you can select the printer icon to view an edit list.
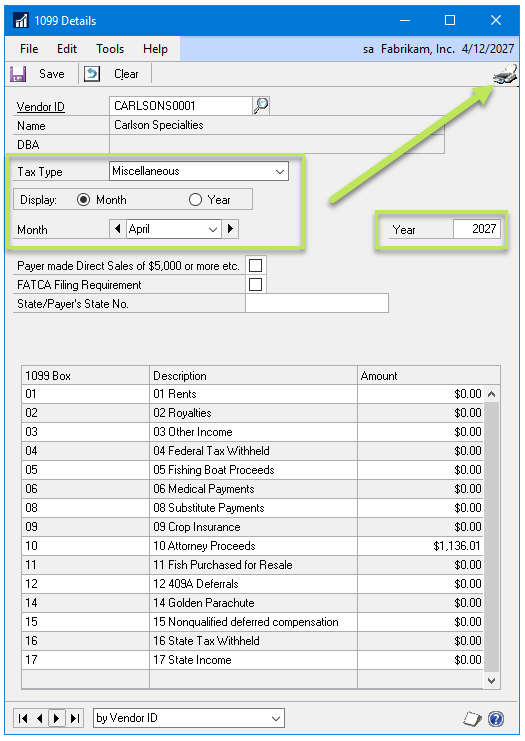
The “1099 Details Window” permits the user to edit individual amounts if desired.
STEP 4: Print Your 1099s
You have updated your vendors and reviewed your work; it’s time to print. Make sure you have the correct 1099 forms on hand and navigate to Tools → Routines → Purchasing → Print 1099. It is important that you verify your Company Address, Payer’s Federal ID Number, 1099 Year and the 1099 Type you will be printing. From here, you can select to print for a single vendor or a range of vendors by name, class, or type.
Once all selections have been made, you can print an edit list to review one last time. To do this, select the printer icon in the upper right of the window.
If additional changes need to be made, you can always edit via the steps above. Once you are ready, select the print button and repeat for each 1099 Type.
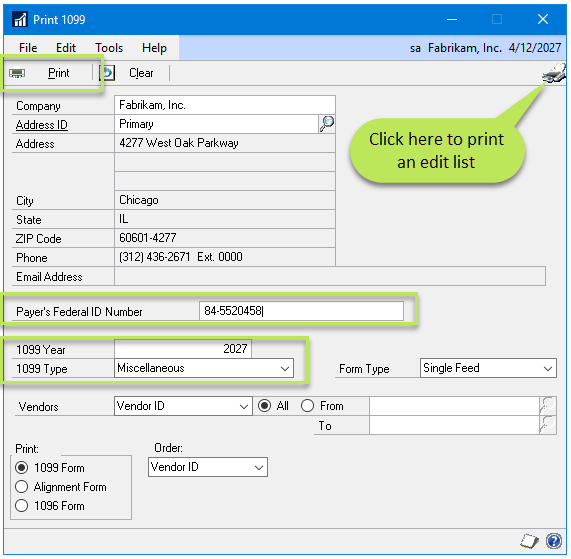
The “Print 1099 Window” can be used to print an edit list showing the 1099s that will print.
That’s it! You have completed the 1099 process. If you run into any issues, please contact us; we will be happy to walk you through the process.
** Note: If you are on a version of Microsoft Dynamics GP older than 18.3, you will notice that you are missing the 1099-NEC Tax Type; don’t hesitate to contact us today for help upgrading.**
NEED HELP MAKING YOUR DYNAMICS GP ENVIRONMENT SIMPLER TO MANAGE?
Learn how the Telmar Team can help!
Telmar Computer Solutions, Inc. is providing the information in this publication as a courtesy, free of charge, to share information with the general public. Nothing in this publication is intended to be, nor should be, interpreted as advice or consultation on any matter, including taxes, accounting, business management, system configuration or operation, or any other similar topic. Please engage the services of an appropriate professional for assistance in these areas. Telmar Computer Solutions, Inc. is not responsible for any loss, including downtime, lost files/data, rework, or other expenses sustained by you, your company, or any person who relies on this publication.
OTHER POSTS YOU MAY BE INTERESTED IN…
4 SIMPLE STEPS TO YEAR-END CLOSING IN DYNAMICS GP
Countless articles have been written about the Dynamics GP year-end closing procedure. Most of the articles contain excessive steps without an explanation of the process. In this article, Telmar’s Dynamics GP experts will guide you through a simple 4-step process for closing the year in Microsoft Dynamics GP.
How to See Who is Logged into Dynamics GP
As you may know, Dynamics GP licensing is based on concurrent user. For example, if you have five user licenses, only five users can be logged in at a time. Because of this, you may have received the "You reached the maximum number of users logged into the system" message. Trying to figure out who is logged in can be frustrating and time-consuming. Also, from time to time, a user’s session can become "stranded" due to power outages, frozen workstations, or being disconnected from the network.
Step-by-Step Guide to Rebuild the Management Reporter Data Mart
Microsoft’s Management Reporter makes use of a Data Mart to store general ledger data in a structure that is more efficient for financial reporting. On large datasets, this approach makes Management Reporter considerably faster than FRx. Because this Data Mart is simply a copy of existing data, it is possible for it to get out of sync with the original data. When this happens, it is necessary to rebuild the Management Reporter Data Mart.
0 Comments